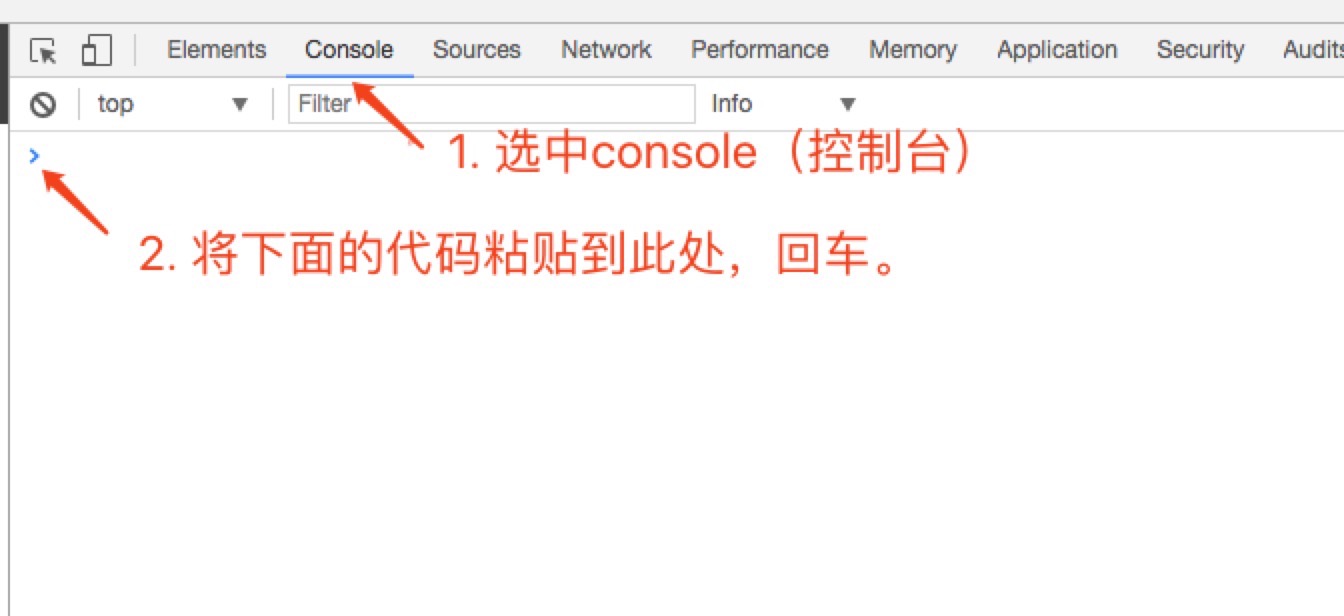
豆腐di青春

Front End Engineer

0%

  1. 常规安装

    1
    2
    3
    4
    5
    6
    7
    8
    9
    10
    11
    12
    13
    # init venv
    sudo apt-get install python3-venv
    python3 -m venv venv
    source ./venv/bin/activate
    pip3 install wheel

    # 安装依赖
    sudo apt-get install libffi-dev build-essential libssl-dev libffi-dev python3-dev

    # error for cryptography:
    # https://cryptography.io/en/latest/installation/#building-cryptography-on-linux

    pip3 install homeassistant
  2. N1 armbian 系统创建 service: https://www.home-assistant.io/docs/autostart/systemd/

    1
    2
    3
    4
    5
    6
    7
    8
    9
    10
    11
    12
    13
    # /etc/systemd/system/home-assistant.service
    [Unit]
    Description=Home Assistant
    After=network-online.target

    [Service]
    Type=simple
    User=shty
    ExecStart=/<path>/hass -c "/<configpatch>/homeassistant"

    [Install]
    WantedBy=multi-user.target

    启用:

    1
    2
    3
    4
    5
    6
    sudo systemctl --system daemon-reload
    sudo systemctl enable home-assistant
    sudo systemctl start home-assistant

    sudo systemctl status home-assistant
    sudo systemctl disable home-assistant
  3. 获取 cpu 温度 command_line

    1
    2
    3
    4
    5
    6
    - platform: command_line
    name: CPU Temperature
    command: "cat /sys/class/hwmon/hwmon0/temp1_input"
    unit_of_measurement: "°C"
    value_template: '{{ value | multiply(0.001)|round(1) }}'
    scan_interval: 30

python 命令行

  1. 新建虚拟环境

    1
    2
    3
    4
    5
    6
    7
    8
    9
    10
    11
    # use virtualenv
    virtualenv --no-site-packages venv --python=python3

    # or
    sudo apt-get install python3-venv
    python3 -m venv venv

    # then
    source venv/bin/activate
    pip install wheel

  2. pm2 启动 python

    pm2 start ./src/main.py --name py-demo --interpreter ./venv/bin/python

  3. 生成当前项目的 requirements.txt

    1
    2
    3
    4
    pip freeze
    pip freeze > requirements.txt
    # install
    pip install -r requirements.txt
  4. 修改国内 pip 镜像:

    1
    2
    3
    4
    5
    # ~/.pip/pip.conf

    [global]
    trusted-host = mirrors.aliyun.com
    index-url = https://mirrors.aliyun.com/pypi/simple

web 开发经常需要面对  各种分享的需求, 下面总结了一些分享落地页需要设置的信息

相关链接

  1. facebook ** debug **, doc,
  2. twitter: ** debug **, Summary Card, summary_large_image Card

页面设置

1
2
3
4
5
6
7
8
9
10
11
12
13
14
15
16
17
18
19
20
21
22
23
24
<!-- twitter setting -->
<meta name="twitter:card" content="${card_type}">
<meta name="twitter:site" content="${site_name}" />
<meta property="twitter:title" content="${title}">
<meta property="twitter:image" content="${image_url}">
<meta property="twitter:image:alt" content="${image_alt}">
<meta property="twitter:description" content="${description}">
<meta property="twitter:app:id:iphone" content="${apple_store_id}">
<meta property="twitter:app:id:googleplay" content="${googleplay_id}">
<!-- facebook setting -->
<meta property="fb:app_id" content="${app_id}">
<!-- open graph -->
<meta property="og:type" content="website">
<meta property="og:site_name" content="${site_name}" />
<meta property="og:url" content="${website_url}">
<meta property="og:image" content="${image_url}">
<meta property="og:image:width" content="${image_width}">
<meta property="og:image:height" content="${image_height}">
<meta property="og:title" content="${description}">
<meta property="og:description" content="${description}">
<!-- article -->
<meta property="article:tag" content="${tag}" />
<meta property="article:publisher" content="${publisher}" />
<meta property="article:author" content="${author}" />

UI 图片准备:

1. facebook:

大小:<=8MB
比例:1.91:1 宽高比大尺寸: 推荐: 1200x630, 最低:600x315
小尺寸: 200x200

2. twitter: 

  • 长方形:

    大小:<=5MB
    比例: 2:1 宽高比大尺寸:4096x4096
    小尺寸:300x157
    格式:JPG, PNG, WEBP and GIF

  • 正方形:

    大小:<=5MB
    比例: 1:1 宽高比尺寸: 最大: 4096x4096, 最小:144x144
    格式:JPG, PNG, WEBP and GIF

文案准备

注:Facebook 不支持分享传入 title,twitter 可以预制一段用户分享的文案

分享卡片信息:

title:不包含品牌名称或未提及域名的清晰标题。
description: 清楚的说明,至少包含两个句子。
image:alt:<= 420 characters.

1. 问题描述:

当我们使用react进行服务端渲染的时候常会遇到在客户端又重新渲染(非期望的重复渲染)的问题,react提示如下:

1
2
3
React attempted to reuse markup in a container but the checksum was invalid. This generally means that you are using server rendering and the markup generated on the server was not what the client was expecting. React injected new markup to compensate which works but you have lost many of the benefits of server rendering. Instead, figure out why the markup being generated is different on the client or server:
(client) <!-- react-empty: 1 -
(server) <div class="castboxGl

2.产生该问题的原因:

  1. 两端渲染的数据源不一致:通常我们会将服务端渲染时的使用的数据同样传递到客户端,两端共用同一组数据渲染确保一致性。常见代码如下:

    1
    2
    3
    4
    5
    6
    7
    8
    9
    10
    11
    12
    13
    14
    15
    16
    17
    18
    19
    20
    21
    22
    // server side:
    const store = createStore(initialData)
    const content = renderToString(
    <Provider store={store}>
    <RouterContext {...renderProps}/>
    </Provider>
    )
    ...
    <div id="root">${content}</div>
    <!-- 下面将state传递到客户端 -->
    <script>window.__INITIAL_STATE__ = ${JSON.stringify(state)};</script>

    // client side:

    const store = createStore(window.__INITIAL_STATE__)
    ...
    ReactDOM.render(
    <Provider store={store}>
    <Router history={getHistory(store)} onUpdate={logPageView} routes={rootRoute} />
    </Provider>, rootElement
    )

  2. maybe it’s just because there is an additional wrapper

  3. after implementing react-router code splitting
    https://github.com/Hashnode/mern-starter/issues/149

  4. and so on…

推荐一款chrome插件:Allow Copy https://chrome.google.com/webstore/detail/allow-copy/abidndjnodakeaicodfpgcnlkpppapah?utm_source=chrome-ntp-icon

1. 打开要复制的内容所在的网页,然后按F12开启控制台

2. 按图示操作:

1
2
3
4
5
6
7
8
9
10
11
复制以下代码:

document.body.addEventListener('mouseup', function (e) {
var txt = window.getSelection();
if (txt.toString().length > 1) {
console.error('选中的内容为:');
console.info('\n\n'+txt.toString()+'\n\n');
console.error('完毕\n');
}
}, false)

3. 如图即为可用:

Mac 前端开发环境搭建笔记

  1. brew安装

1
/usr/bin/ruby -e "$(curl -fsSL https://raw.githubusercontent.com/Homebrew/install/master/install)"

Homebrew

1
2
3
4
brew install node
brew install git-flow
brew install ffmpeg
brew install mongodb
  1. 安装常用软件:

iterm2 :

[Oh-my-zsh](/2016/11/12/Oh-my-zsh/)

dash :

postman :

slack :

chrome :

atom :

vscood :

sublime :

iStat Menus :

OmniDiskSweeper :

shadowsocksx :

sketch :

git使用笔记

  1. git 一些设置

    1
    2
    3
    4
    5
    6
    7
    8
    git config --global alias.br branch
    git config --global alias.ci commit
    git config --global alias.co checkout
    git config --global alias.st status
    # 很好看地显示git log
    git config --global alias.lg "log --color --graph --pretty=format:'%Cred%h%Creset -%C(yellow)%d%Creset %s %Cgreen (%cr) %C(bold blue)<%an>%Creset' --abbrev-commit --"
    git config --global log.date iso
    # 设置用户信息
  2. 用git config命令查看配置文件

命令参数
–list, 简写 -l
格式:git config [–local|–global|–system] -l
查看仓库级的config,git config –-local -l
查看全局级的config,git config -–global -l
查看系统级的config,git config –-system -l
查看当前生效的配置:git config -l,显示最终三个配置文件计算后的配置信息

  1. git remote

1
git remote add helloworld git@github.com:helloworld/helloworld.github.io.git

上面的命令就会增加URL地址为

1
git@github.com:helloworld/helloworld.github.io.git

,名称为 helloworld 的远程服务器,以后提交代码的时候只需要使用 helloworld 别名即可
查看远程仓库:$ git remote -v
添加远程仓库:$ git remote add [name] [url]
删除远程仓库:$ git remote rm [name]
修改远程仓库:$ git remote set-url –push [name] [newUrl]
拉取远程仓库:$ git pull [remoteName] [localBranchName]
推送远程仓库:$ git push [remoteName] [localBranchName]

*如果想把本地的某个分支test提交到远程仓库,并作为远程仓库的master分支,或者作为另外一个名叫test的分支,如下:
$git push origin test:master // 提交本地test分支作为远程的master分支
$git push origin test:test // 提交本地test分支作为远程的test分支

  1. 分支(branch)操作相关命令

    查看本地分支:$ git branch
    查看远程分支:$ git branch -r
    创建本地分支:$ git branch [name] —-注意新分支创建后不会自动切换为当前分支
    切换分支:$ git checkout [name]
    创建新分支并立即切换到新分支:$ git checkout -b [name]
    删除分支:$ git branch -d [name] —- -d选项只能删除已经参与了合并的分支,对于未有合并的分支是无法删除的。如果想强制删除一个分支,可以使用-D选项
    合并分支:$ git merge [name] —-将名称为[name]的分支与当前分支合并
    创建远程分支(本地分支push到远程):$ git push origin [name]
    删除远程分支:$ git push origin :heads/[name] 或 $ gitpush origin :[name]

*创建空的分支:(执行命令之前记得先提交你当前分支的修改,否则会被强制删干净没得后悔)
$git symbolic-ref HEAD refs/heads/[name]
$rm .git/index
$git clean -fdx

  1. 版本(tag)操作相关命令

    查看版本:$ git tag
    创建版本:$ git tag [name]
    删除版本:$ git tag -d [name]
    查看远程版本:$ git tag -r
    创建远程版本(本地版本push到远程):$ git push origin [name]
    删除远程版本:$ git push origin :refs/tags/[name]
    合并远程仓库的tag到本地:$ git pull origin –tags
    上传本地tag到远程仓库:$ git push origin –tags
    创建带注释的tag:$ git tag -a [name] -m ‘yourMessage’

  2. 子模块(submodule)相关操作命令

添加子模块:$ git submodule add [url] [path]
如:$git submodule add git@github.com:helloworld/hexo-theme-next.git themes/next

初始化子模块:$ git submodule init —-只在首次检出仓库时运行一次就行
更新子模块:$ git submodule update —-每次更新或切换分支后都需要运行一下

删除子模块:(分4步走)

  1. $ git rm –cached [path]

  2. 编辑“.gitmodules”文件,将子模块的相关配置节点删除掉

  3. 编辑“ .git/config”文件,将子模块的相关配置节点删除掉

  4. 手动删除子模块残留的目录

  5. .ssh权限问题

Permissions 0644 for ‘/home/robin/.ssh/id_rsa’ are too open.
It is recommended that your private key files are NOT accessible by others.
This private key will be ignored.
bad permissions: ignore key: /home/robin/.ssh/id_rsa

解决方案

1
2
3
chmod 755 ~/.ssh/
chmod 600 ~/.ssh/id_rsa ~/.ssh/id_rsa.pub
chmod 644 ~/.ssh/known_hosts

nodejs models

工具类:

  1. superagent 模拟登陆
  2. underscore js方法类

Your terminal never felt this good before.

Oh-My-Zsh is an open source, community-driven framework for managing your ZSH configuration. It comes bundled with a ton of helpful functions, helpers, plugins, themes, and a few things that make you shout…

“Oh My ZSH!”

Install oh-my-zsh now

1
2
3
4
5
6
7
8
Via curl:

$ sh -c "$(curl -fsSL https://raw.github.com/robbyrussell/oh-my-zsh/master/tools/install.sh)"

Via wget:

$ sh -c "$(wget https://raw.github.com/robbyrussell/oh-my-zsh/master/tools/install.sh -O -)"